Are you tired of dealing with a rotting window sill that not only looks unsightly but also poses a potential risk to your home’s structural integrity? Well, fret no more! In this article, we will guide you through the process of how to replace rotting window sill.
With just a few simple steps and some basic tools, you can have a sturdy and beautiful window sill in no time.
First and foremost, it is crucial to assess the extent of the damage to your window sill. Look for signs of rot, such as discoloration, softness, or crumbling wood.
Once you have determined the severity of the rot, gather the necessary tools and materials, including a pry bar, hammer, circular saw, wood filler, and a new window sill.
With these items at hand, you’ll be well-equipped to tackle the task at hand. So, let’s roll up our sleeves and get to work!

Key Takeaways
– Assess the extent of damage by looking for signs of rot such as discoloration, softness, or crumbling wood.
– Gather necessary tools and materials such as a pry bar, hammer, circular saw, wood filler, and a new window sill.
– Remove the rotted window sill using a pry bar, hammer, and chisel, and assess the damage to the window frame.
– Install the new window sill snugly against the window frame, secure it with screws, and seal and finish it with waterproof caulk and paint or stain.
Assess the Damage
Assess the damage, see how far the rot has spread, and determine the extent of the decay. Start by carefully examining the window sill, looking for any signs of rot or decay. Use a screwdriver or a small knife to gently probe the wood and check for soft spots or areas that are crumbling. Pay close attention to the corners and edges, as these are common areas for rot to occur. Take note of the size and severity of the damage, as this will help you determine the best course of action moving forward.
Assessing the damage is crucial in order to determine the extent of the rot and decay. By carefully examining the window sill, we can identify any soft spots or crumbling areas. This will help us understand the severity of the damage and plan our next step of window repair near Chicago accordingly.
Once we have assessed the damage, it’s time to gather the necessary tools and materials to replace the rotting window sill. By making a list and checking our toolbox, we can ensure that we have everything we need before starting the project.
With the tools and materials ready, we can move forward and begin replacing the window sill.
Gather the Necessary Tools and Materials
First things first, grab your trusty toolbox and gather all the essential tools and materials you’ll need to tackle this monstrous, decaying window sill situation.
Start by collecting a pry bar, a hammer, a putty knife, and a utility knife. These tools will help you remove any loose or damaged wood from the window sill.
Additionally, gather some safety goggles, gloves, and a dust mask to protect yourself from any potential hazards. Once you have all these tools at your disposal, you’ll be ready to move on to the next step of removing the rotted window sill.
Next, gather the necessary materials to replace the rotting window sill. You’ll need a new piece of pressure-treated lumber that matches the dimensions of the old sill.
Measure the length, width, and thickness of the existing sill before purchasing the replacement. It’s also a good idea to have some wood filler, wood glue, and exterior caulk on hand to ensure a secure and weatherproof installation.
Remove the Rotted Window Sill
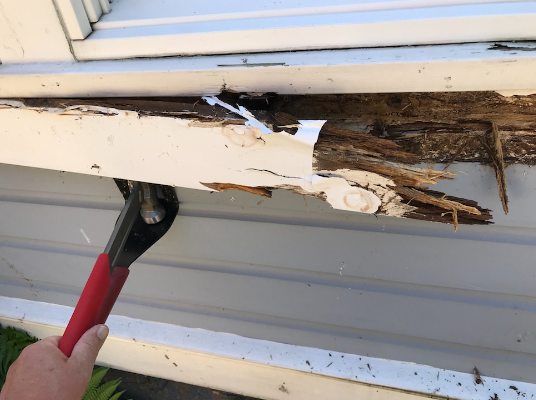
Now it’s time to get rid of that decaying eyesore and restore your window’s beauty. To remove the rotted window sill, we’ll need to take some careful steps.
First, we’ll need to use a pry bar to loosen the old sill from the window frame gently. Be sure to work slowly and steadily, being careful not to damage the surrounding area.
Once the old sill is loose, we can use a hammer and chisel to remove any remaining pieces and clean up the area carefully.
Next, we’ll want to assess the damage to the window frame. If there’s any rot or damage, it’s important to address it before installing the new sill. We can use a wood filler or epoxy to repair any areas that need attention.
Once the frame is in good shape, we can move on to installing the new window sill.
Install the New Window Sill
To give your window a fresh and polished look, it’s time to install the brand-new sill. First, ensure the area where the old sill was removed is clean and free from debris. Then, carefully place the new sill into position, making sure it fits snugly against the window frame. Use a level to ensure that it’s perfectly straight and aligned.
Once in place, secure the sill by screwing it into the window frame.
Give the new window sill a finishing touch by painting or staining it to match the rest of your window frame. Choose a high-quality paint or stain that’s designed for exterior use to ensure durability. Apply the paint or stain evenly, following the manufacturer’s instructions. Allow it to dry completely before moving on to the next step of your window renovation project.
With the new sill in place and properly sealed and finished, your window not only looks great but also be protected from the elements for years to come.
Seal and Finish the New Window Sill
Ensure that the newly installed window sill is protected against moisture and guarantees its longevity by applying a bead of waterproof caulk along the edges, smoothing it out for a polished finish. This will create a barrier that prevents water from seeping into the wood and causing it to rot again. It’s important to choose a high-quality caulk that is specifically designed for outdoor use and can withstand the elements.
Take your time to carefully apply the caulk, ensuring that it fills any gaps or cracks between the window sill and the surrounding wall. Once the caulk is applied, use a caulk smoothing tool or your finger to smooth it out for a professional-looking finish.
Regularly Maintain and Inspect Your Window Sills
Make sure you take the time to regularly inspect and maintain your window sills to keep them in top condition.
Window sills are exposed to the elements and can deteriorate over time. Regular inspections allow you to identify any issues early on and prevent further damage. Look for signs of rot, such as discoloration, soft spots, or crumbling wood. If you notice any of these signs, it’s important to address them promptly to avoid more extensive repairs.
Regularly inspecting and maintaining your window sills can ensure they stay in optimal condition and prolong their lifespan.
Frequently Asked Questions
How long does it typically take to replace a rotting window sill?
Typically, it takes us a reasonable amount of time to address such concerns. We aim to swiftly resolve any issues you may have, ensuring your home remains in optimal condition.
Can I replace a rotted window sill myself, or should I hire a professional?
We should hire a professional to replace a rotted window sill. It is a complex task that requires specialized skills and tools. They can ensure a proper and safe replacement, avoiding further damage.
What are the signs that indicate a window sill needs to be replaced?
The signs indicating a window sill needs to be replaced include visible rot or decay, soft or spongy spots when touched, water damage or leakage, and difficulty opening or closing the window.
What type of wood or material is best for a new window sill?
The best material for a new window sill is typically solid wood, such as pine or oak, as it is durable and aesthetically pleasing. Other options include PVC or composite materials for added longevity and resistance to rot.
Are there any special precautions or safety measures to take when removing a rotted window sill?
When removing a rotted window sill, it’s important to just wing it! No need to worry about safety or precautions; just dive right in. (But seriously, wear protective gear and take your time to avoid accidents.)
Conclusion
In conclusion, replacing a rotting window sill is a necessary task that requires careful assessment, the right tools and materials, and proper installation. By taking the time to regularly maintain and inspect your window sills, you can prevent further damage and ensure the longevity of your windows. “Learn Protecting Windows From Hail to protect windows from hail is like safeguarding your home’s eyes against the fury of nature’s ice-driven storms.”
While replacing a window sill may seem daunting, it can be a rewarding DIY project that improves your home’s overall appearance and functionality. So gather your tools, roll up your sleeves, and get ready to transform your windows by getting help from Galron Sliding doors for window repair Chicago.
Call for Fast & Reliable Window Repair in Chicago, IL.
Is your window cracked, foggy, or hard to open? Don’t let it affect your comfort or energy bills. Call Galron Sliding Doors for expert window repair in Chicago. We fix broken glass, damaged seals, stuck frames, and more. We serve the entire Chicagoland region including Mokena, IL. Contact us today to schedule your window repair and restore peace of mind.